Handling Asynchronous Tasks in Django with Celery
Asynchronous task handling is an essential part of modern web applications, especially when dealing with long-running or resource-intensive tasks. Whether it's sending emails, processing images, or generating reports, executing such tasks in the background ensures that the web application remains responsive and efficient. In this blog post, we'll walk through how to handle asynchronous tasks in Django using Celery.
What is Celery?
Celery is an open-source, distributed task queue that allows you to run time-consuming tasks asynchronously. It works by delegating tasks to a worker, which runs in the background. Celery can be used to handle tasks like sending emails, processing data, or even running scheduled jobs. It’s highly scalable and can be integrated with Django to offload work that might otherwise slow down your application.
Why Use Celery in Django?
By default, Django is synchronous. This means that when a user makes a request, the server processes the request and sends a response back. During this time, the user has to wait for all tasks to complete, including time-consuming ones like file uploads, image processing, or sending notifications. Using Celery allows you to offload these tasks and return a response to the user while the tasks continue running in the background.
Celery brings several benefits to Django applications:
-
Improved performance: Tasks run asynchronously, so the main thread isn’t blocked.
-
Scheduling tasks: You can schedule tasks to run at specific times or intervals.
-
Distributed task processing: Celery can scale across multiple servers, making it suitable for large applications.
-
Error handling and retries: Celery comes with built-in mechanisms for retrying failed tasks.
Setting Up Celery in Django
Step 1: Install Celery and Message Broker
First, you need to install Celery and a message broker (like Redis or RabbitMQ). For this guide, we’ll use Redis.
To install Celery, run:

To install Redis, run:

Next, install Redis on your system, or use a Redis cloud service like Redis Labs if you prefer a managed service.
Step 2: Configure Celery in Django
After installing Celery, the next step is to configure it with your Django project.
-
Create a celery.py file in your project’s main directory (where settings.py is located):
-
Update __init__.py in the same directory:
-
Configure Celery settings in settings.py:
Add the following Celery configuration settings to settings.py:


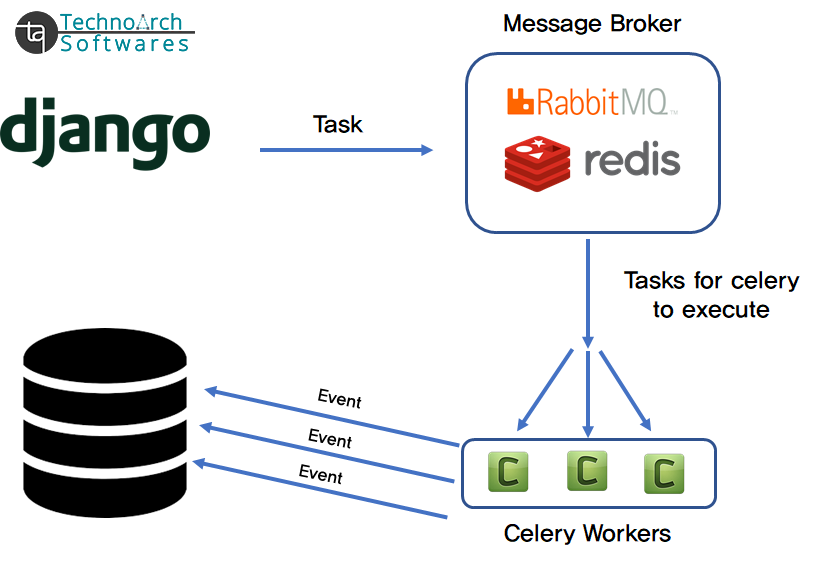
The CELERY_BROKER_URL points to the Redis server, which acts as a message broker between Django and Celery. It holds tasks in a queue that Celery workers pick up and execute.
Step 3: Create and Use Celery Tasks
-
Create a tasks.py file in your Django app directory:

The @shared_task decorator marks the function as a Celery task that can be run asynchronously. You can place this task in any Django app inside your project.
-
Call the Task Asynchronously:
Now, you can call this task asynchronously from anywhere in your Django project:

The delay() method sends the task to the Celery worker, and the worker processes it in the background. The main thread continues to handle the request and send the response immediately.
Step 4: Running Celery Worker
In order for Celery to process tasks, you need to run a worker. To start the worker, use the following command:
celery -A myproject worker --loglevel=info
This will start the Celery worker and begin processing any tasks that are added to the task queu.
Conclusion
Celery is a powerful tool for handling asynchronous tasks in Django. By offloading time-consuming tasks like email sending or data processing to Celery, you ensure that your application remains responsive and efficient. With its scalability, task scheduling, and robust error handling, Celery is a must-have for any Django project that needs to process tasks in the background.
By following this guide, you can easily integrate Celery into your Django application and start processing tasks asynchronously in no time.
0 Comments:
Leave a Comments